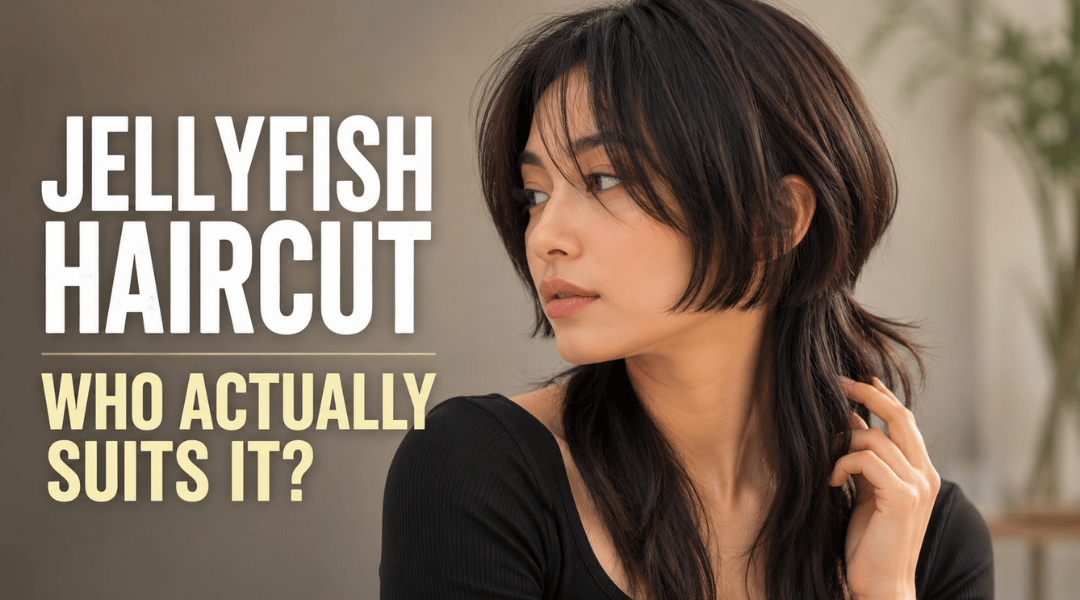
Every jellyfish cut reference photo you’ve saved is on straight hair. Clean disconnection. Sharp geometric bell. Two layers reading like an architectural decision. You already know your curls won’t do that — but you don’t know what they will do, because nobody’s shown you.
That’s the problem. Not that the jellyfish cut doesn’t work on curly hair — it can look incredible. The problem is that every guide treats curly texture as a footnote. A paragraph near the bottom: “this cut also works on curls.” Then a pivot to more straight-hair photos.
This isn’t that. This is what actually happens when you put a two-tiered, disconnected cut on hair that shrinks, expands, and has its own structural opinions. What changes, which curl patterns respond best, where it goes wrong, and how to set it up so you don’t end up resenting your reflection by week six.
If you haven’t read the full breakdown of what a jellyfish haircut is and how it works, start there. This guide assumes you know the basics and need the texture-specific depth.
Why Curls Change Everything About This Cut
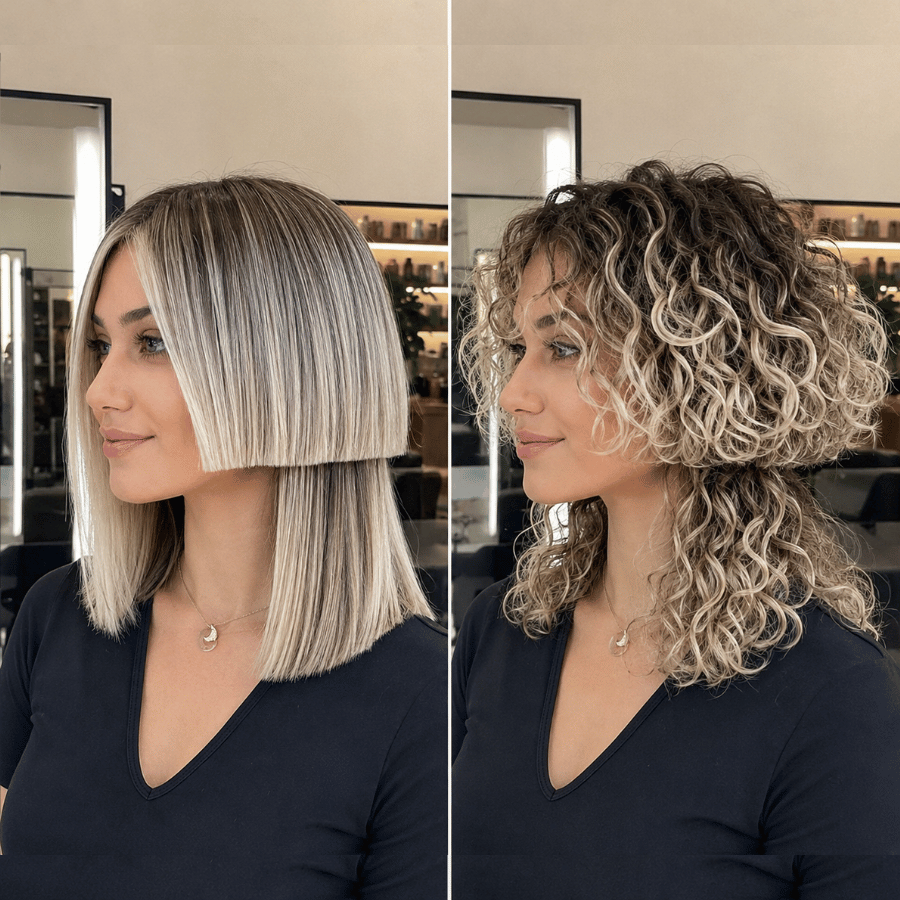
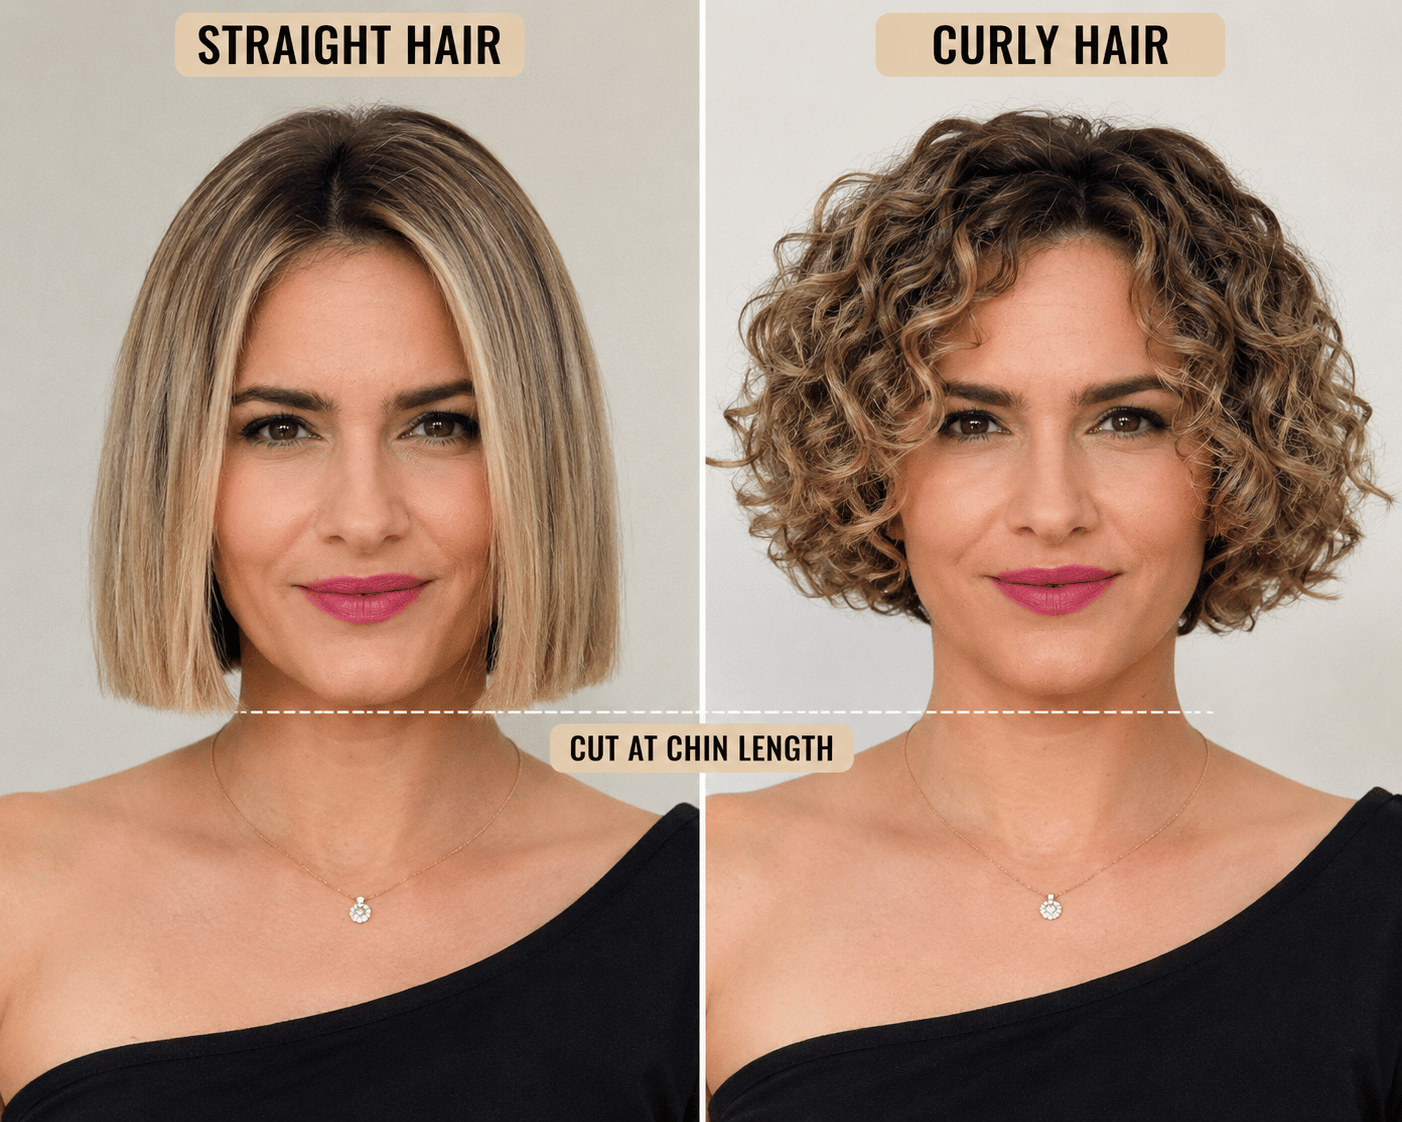
On straight hair, the jellyfish cut is defined by a clean horizontal line where the short top layer ends and the long bottom layer begins. Gravity keeps the top layer compact. The disconnection reads as a deliberate architectural choice.
On curls, three things happen simultaneously that reshape the entire silhouette.
First, shrinkage pulls the top layer upward. A cut made at chin-length on stretched or wet hair can spring up to cheekbone-level once the curls contract. That changes the face-framing and widens the perceived gap between layers.
Second, volume pushes the top layer outward. The “bell” shape becomes rounder, fuller, and more dramatic than it ever reads on straight hair. Depending on your curl density, that bell can dominate the silhouette in a way that looks intentionally bold — or unintentionally overwhelming.
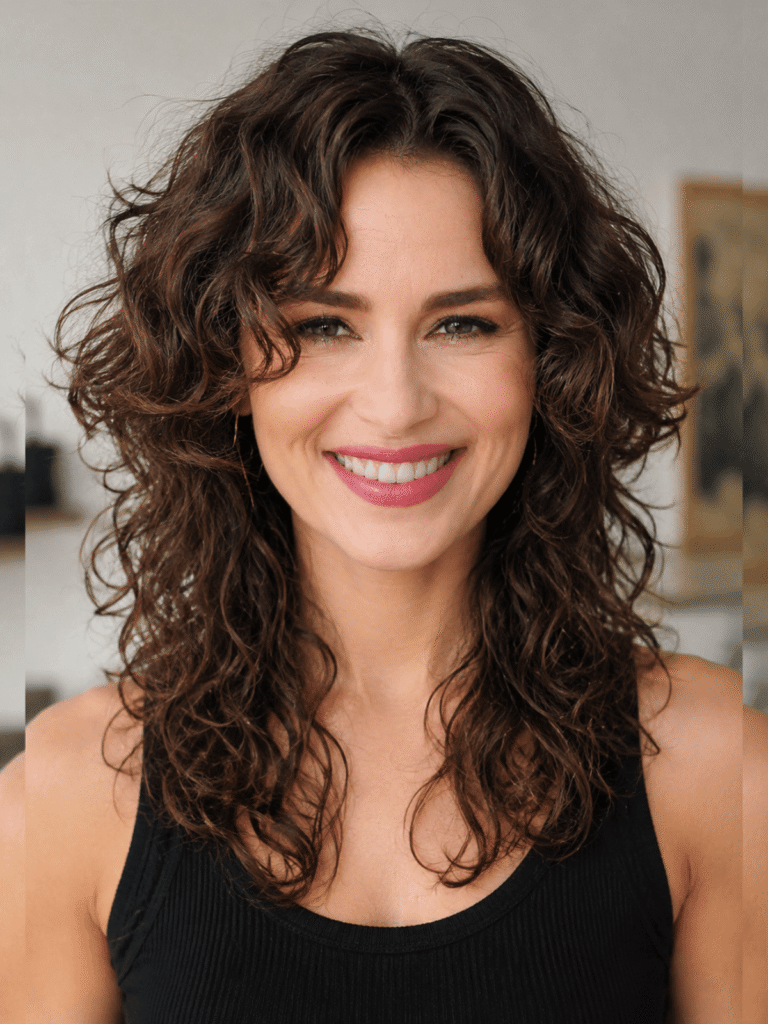
Third, the disconnection line softens. Curly texture obscures the sharp boundary between layers. The cut reads less like geometry and more like a voluminous, textured statement. Whether that’s a feature or a drawback depends entirely on what you wanted.
None of this makes the cut wrong for curls. It makes it a different cut on curls — and if you walk in expecting the straight-hair version, you’ll walk out confused.
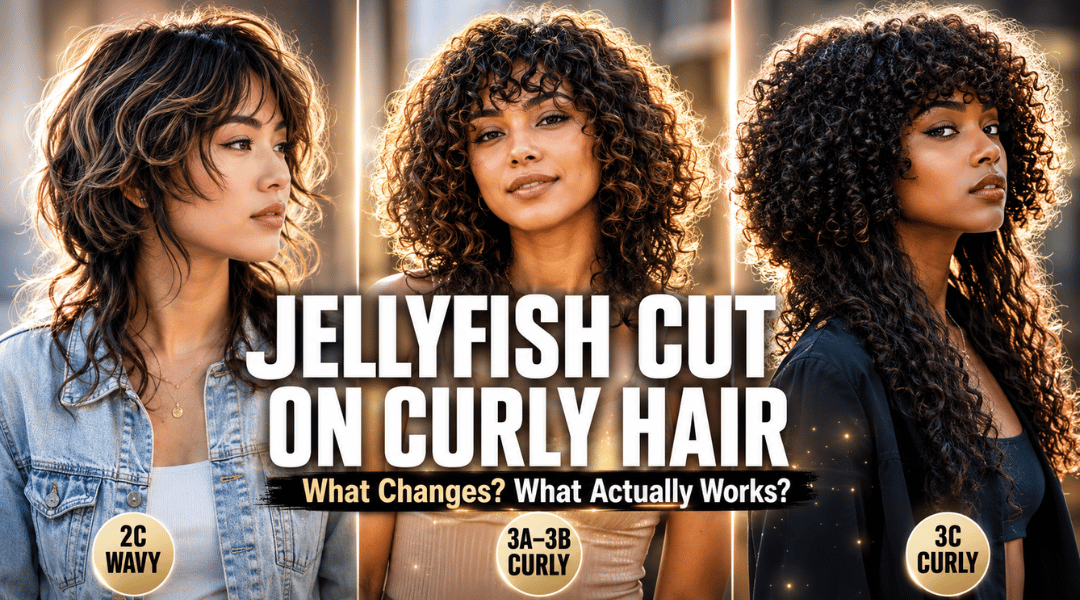
Which Curl Patterns Work Best
Not all curls interact with this cut the same way. The tighter the pattern, the more shrinkage and volume you’re working with — and the more the cut diverges from the straight-hair version.
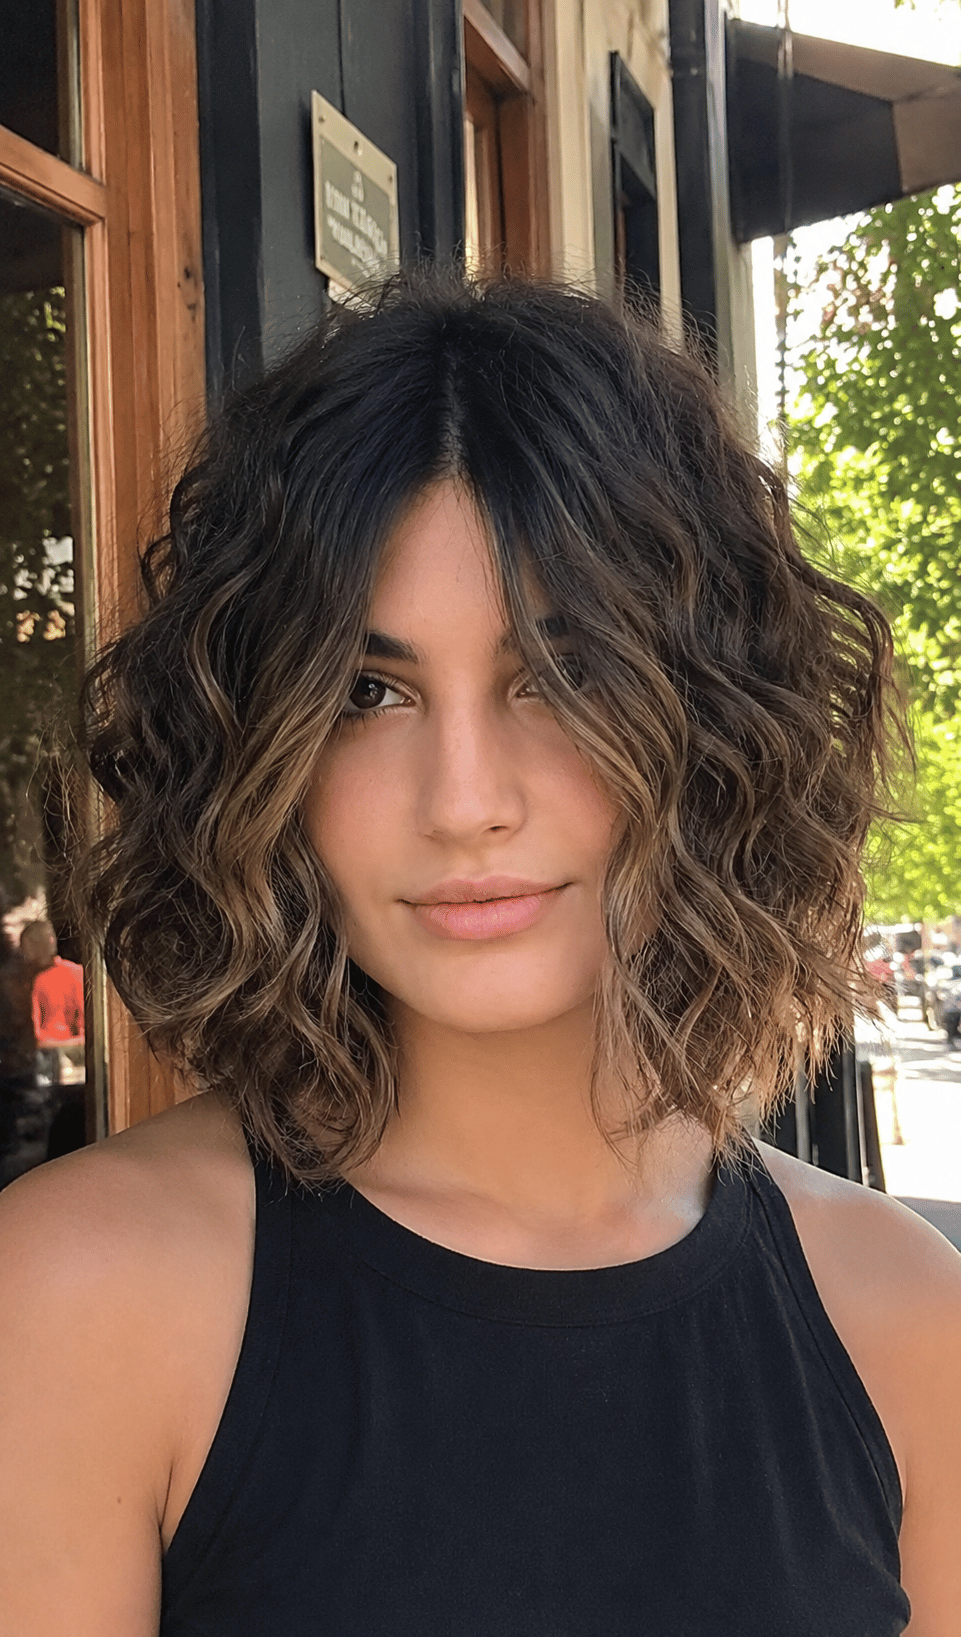
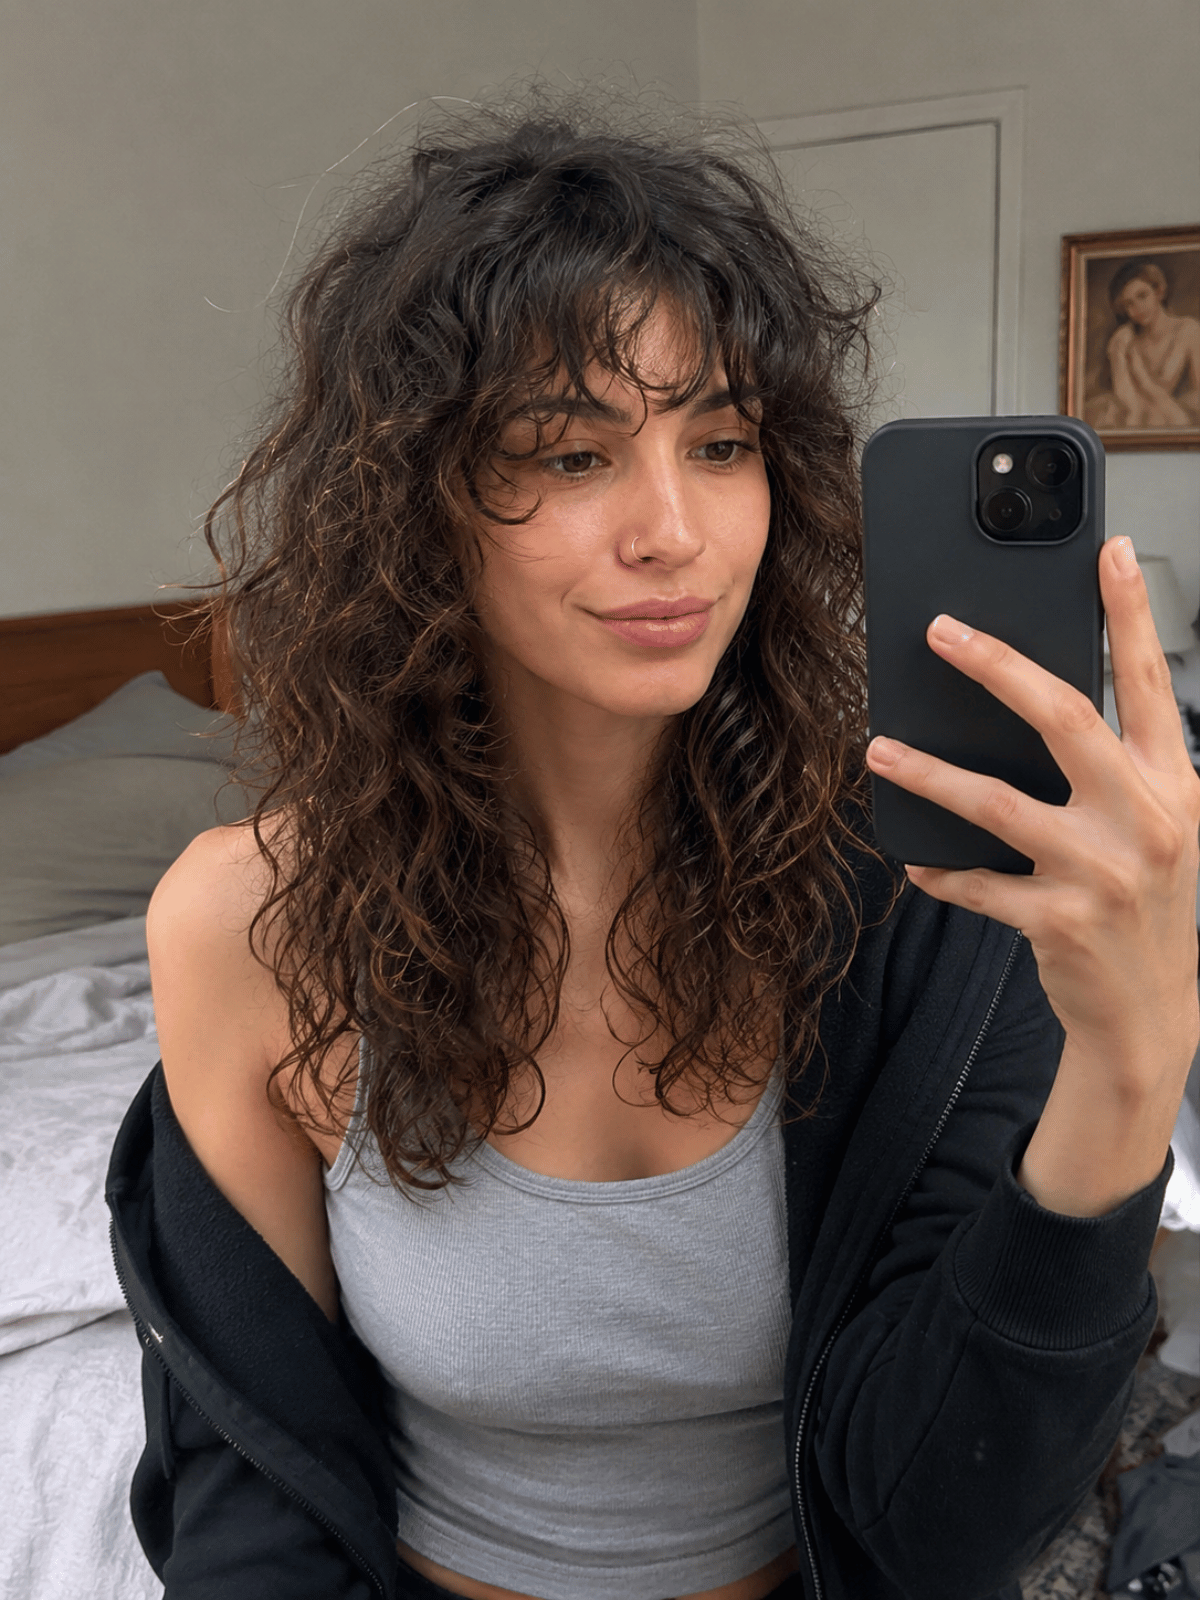
2B–2C waves are the easiest entry point. Waves soften the disconnection between layers without dramatically changing the proportions. Shrinkage is minimal — maybe half an inch of lift on the top layer. The cut reads as a jellyfish with natural texture rather than a completely different shape. If you want the closest thing to the straight-hair silhouette without actually having straight hair, this is your range.
3A curls make a strong candidate. Enough curl definition to create visible texture contrast between the two layers, and moderate shrinkage that needs planning but won’t transform the proportions beyond recognition. The top layer gains noticeable volume but still holds a recognizable bell shape. Most stylists experienced with textured hair can calibrate this range confidently.
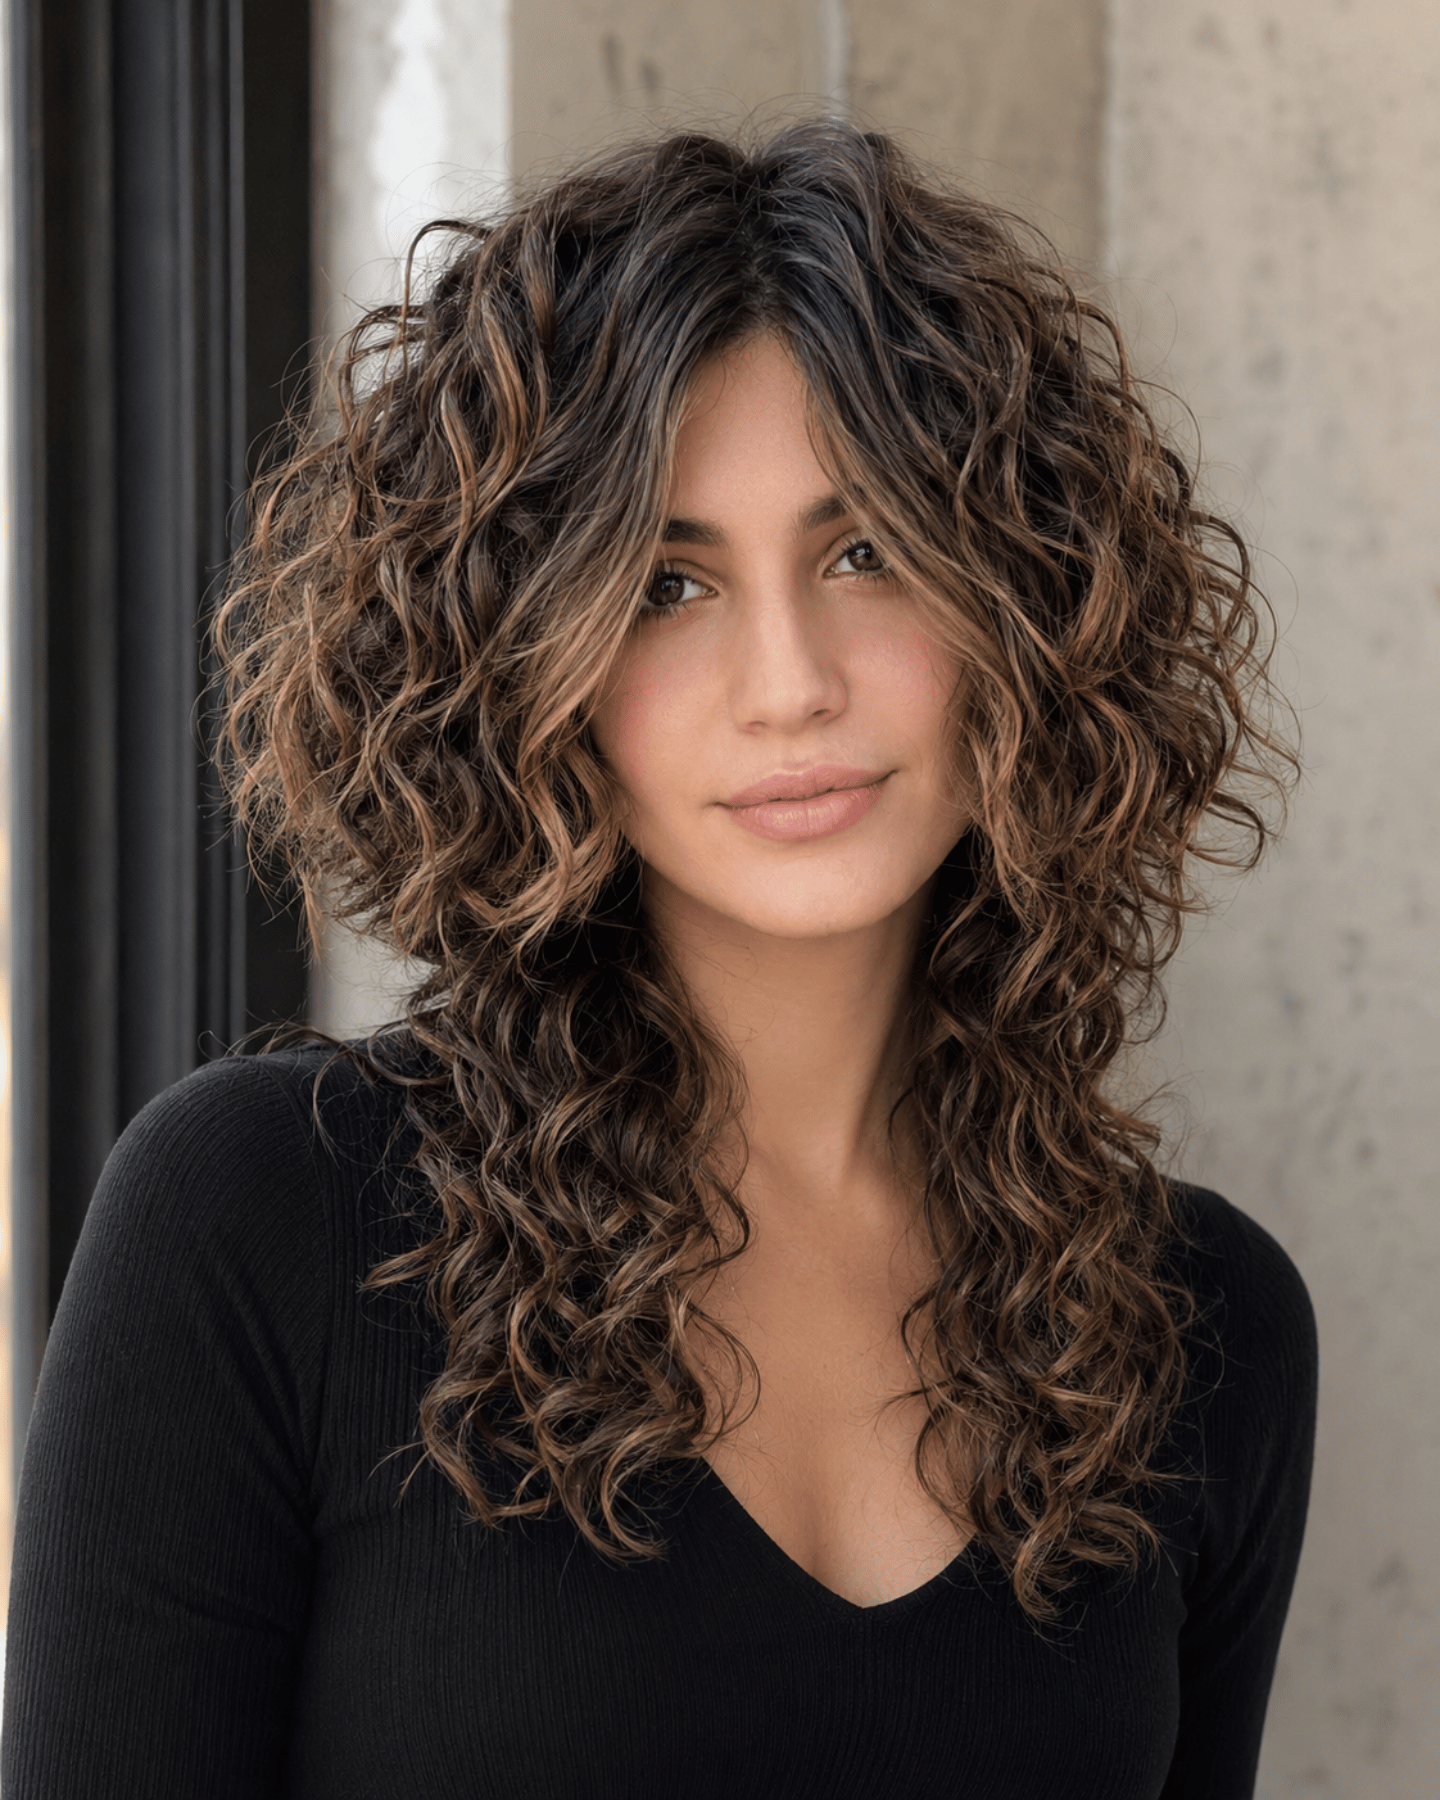
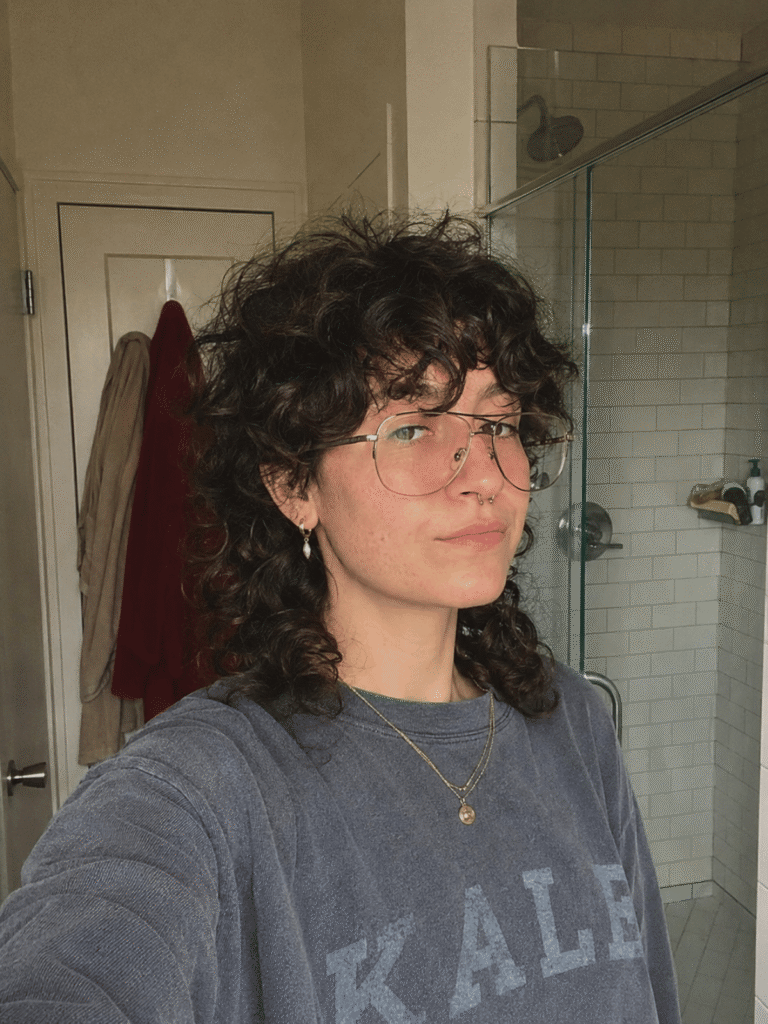
3B curls are where the cut gets genuinely bold. Significant volume on the top layer turns the bell into a rounded, dramatic shape that commands attention. The longer bottom layer, by comparison, can appear thinner — especially if your density drops off below the disconnection line. This version looks incredible when curl density is consistent from root to tip across both layers. When density is uneven, the contrast can read as accidental rather than designed.
3C curls work but require aggressive shrinkage planning. The top layer will appear substantially shorter than where it was cut. A stylist cutting 3C curls at chin-level while wet or stretched may produce a top layer that sits at ear-level once dry. The visual gap between layers widens beyond what either you or the stylist intended. Density assessment is critical here — if the bottom layer is less dense than the top, the imbalance becomes hard to style around.
4A–4C coils are possible but the disconnection becomes difficult to read visually. Tight coil patterns can make both layers merge into a single mass, losing the two-tiered separation that defines the jellyfish cut. The cut works best on these textures when the top layer is significantly shorter — ear-level or above — to maintain enough visible contrast. This requires a stylist with deep texture experience. Not every stylist who can cut a jellyfish on straight hair can calibrate one on coils.
Curl Pattern Comparison
| Curl Pattern | Shrinkage Factor | Volume Behavior on Top Layer | Recommended Top Layer Length (Dry) | Disconnection Visibility | Maintenance Level |
|---|---|---|---|---|---|
| 2B–2C Waves | Minimal (0.5–1 inch) | Moderate lift, soft shape | Chin to jaw | Clear — waves soften but don’t obscure | Moderate |
| 3A Curls | Moderate (1–2 inches) | Noticeable volume, defined bell | Jaw to chin | Visible — texture adds character | Moderate-High |
| 3B Curls | Significant (2–3 inches) | Dramatic rounded bell, full silhouette | Chin (sits at jaw after shrinkage) | Softened — curl texture blurs the line | High |
| 3C Curls | High (3–4 inches) | Very round, dominant top section | Below chin (sits at chin after shrinkage) | Partially obscured — density matters | High |
| 4A–4C Coils | Very high (4+ inches) | Dense, compact mass on top | Ear-level or above for visible contrast | Difficult — requires extreme length contrast | Very High |
Density Matters More Than Curl Pattern
Everyone talks about curl pattern. Almost nobody talks about density — and density is the variable that actually determines whether a curly jellyfish cut works or fails.
High-density curls give both layers enough body to hold their shapes independently. The top layer reads as full and rounded. The bottom layer reads as lush and intentional. The contrast between them looks designed.
Low-density curls create a trap. The top layer may still read as voluminous — curls compress and expand in ways that simulate density even when the actual strand count is low. But the bottom layer can’t hide. Fewer strands over a longer length means the “tentacles” look sparse, stringy, and see-through. That undermines the entire point of the cut, because the visual weight is concentrated at the top with nothing anchoring the bottom.
Uneven density — looser curls on top and tighter underneath, or vice versa — creates a different problem. The two layers don’t feel like they belong to the same haircut. One section looks full while the other looks flat. The disconnection reads as accidental rather than architectural.
A density assessment before cutting is non-negotiable. A stylist experienced with textured hair should evaluate both sections of the planned cut — where the top layer will sit and where the bottom layer falls — and tell you honestly whether your density supports the contrast. If it doesn’t, a wolf cut or a textured shag may serve your curls better without the density risk.
Shrinkage Is the Variable Nobody Warns You About
Here’s the math that matters.
A stylist cutting wet or stretched curly hair at chin-length is not giving you a chin-length cut. They’re giving you a cut that sits wherever your curls decide to spring to once they dry. On 3B curls, that’s often jaw-level or higher. On 3C curls, it can reach cheekbone territory.
That changes everything about the cut. The face-framing shifts upward. The perceived gap between layers widens. The overall silhouette becomes shorter and rounder on top than either you or the stylist discussed.
The solution is straightforward and non-negotiable for this specific cut: dry cutting. The stylist cuts your curls in their natural, dry state — where they actually live — and places the disconnection exactly where it needs to be. No guessing. No “it’ll shrink about this much.” No correction appointment two weeks later.
If your stylist doesn’t cut curly hair dry, this isn’t the haircut to experiment with them on. Dry cutting isn’t a preference for a curly jellyfish cut — it’s a structural requirement. The proportions are too specific and the consequences of miscalculating shrinkage are too visible.
The Triangle Problem — and How to Avoid It
There’s a specific silhouette failure that happens almost exclusively on curly hair with this cut.
If the top layer is too long or carries too much volume, and the bottom layer is thinner or less dense, the silhouette goes wide at the top and narrow at the bottom. A triangle. On straight hair, gravity pulls the top layer down and keeps it compact — the triangle doesn’t form. On curls, the top layer expands outward, and without enough visual weight below it, the shape becomes top-heavy.
Two fixes. First: cut the top layer shorter than your instinct tells you. Curls will add volume that compensates for the reduced length. What feels too short when the stylist cuts it will likely feel right once the curls set. Second: make sure the bottom layer has enough density to anchor the silhouette. If it doesn’t, the honest answer is that this cut won’t produce a balanced shape on your hair — and a stylist who tells you that upfront is doing you a favor.
Styling a Curly Jellyfish Cut — Real Routines
Two paths. Both valid. Both produce different results.
Air-Dried / Wash-and-Go
The top layer will expand. The disconnection will soften. The cut will read as a voluminous, textured layered style rather than a sharp two-tiered statement. Many curly-haired people prefer this version — it feels more natural and less performative.
Product approach: curl cream or leave-in conditioner distributed evenly through both layers. Gel or mousse for definition and hold. Scrunch out the crunch once fully dry. The disconnection is still visible but muted — two layers with different curl behavior rather than two layers with a hard boundary.
The cut survives the wash-and-go routine if you accept that the outcome is a relaxed interpretation, not the architectural version you see on straight-hair Instagram posts.
Diffused / Styled
Diffusing with a concentrator attachment on the top layer gives you control over the bell shape. You can guide the curls inward — encouraging them to curve toward the head rather than expanding outward — which produces a more defined, rounder silhouette that reads closer to the classic jellyfish shape.
This takes 20 to 30 minutes on top of your normal wash-day routine. Product approach: lightweight mousse at the roots of the top layer for lift and shape control. Curl cream through the mid-lengths and ends of both layers. Diffuse on medium heat — low speed on the top layer to avoid disrupting the curl clumps. Higher speed is fine on the bottom layer where definition matters less than drying time.
This is the version that looks closest to editorial curly-jellyfish content. It’s also the version that takes real time and effort. Know which version you’re signing up for before you sit in the chair.
Humidity Reality
In humid climates — and Austin qualifies — the top layer absorbs moisture and expands faster than the bottom layer. The bell gets bigger. The proportions shift toward the top-heavy silhouette you’re trying to avoid. Anti-humidity spray helps. A humidity-resistant gel (hard-hold, flexible cast) helps more. But expecting the cut to hold its salon shape through an August afternoon outdoors is not realistic. Plan for the expanded version and build your expectations around what the cut does in your actual environment, not what it does in a temperature-controlled studio.
What to Tell Your Stylist
The communication framework for a curly jellyfish cut is different from the standard version. Here’s what changes.
Bring reference photos on curly hair. Not straight hair. If you show a straight-hair jellyfish photo and say “I want this,” both you and the stylist are working from a reference that your hair cannot replicate. Search specifically for jellyfish cuts on curl patterns similar to yours. If you can’t find any — and you probably won’t find many — that’s a signal to have a longer consultation, not to skip the conversation.
Discuss shrinkage before anything gets cut. Ask directly: “Where will the top layer sit once my curls are dry?” If the stylist can’t answer that confidently for your specific curl pattern, they may not have enough experience with textured hair to execute this cut. That’s useful information.
Request a density assessment. Ask the stylist to evaluate the density of both planned sections — the top layer zone and the bottom layer zone. If there’s a meaningful density difference between them, the disconnection gap and the layer lengths may need to be adjusted to compensate. This conversation should happen before the first cut, not after.
Specify your styling reality. Tell the stylist whether you’re a wash-and-go person or a diffuse-and-style person. This changes how they calibrate the top layer. A wash-and-go version needs a slightly longer top layer because curl expansion will add the volume. A styled version can go shorter because diffusing controls the shape.
Ask about grow-out. “How will this grow out on my curl pattern? When will I need the first reshaping appointment? What will it look like if I miss a trim?” A stylist who can answer these questions for curly hair specifically — not with generic jellyfish advice — is the right stylist for this cut. Our full jellyfish haircut guide covers the general grow-out trajectory, but curly grow-out behaves differently enough to warrant its own conversation.
Grow-Out on Curly Hair
Different texture, different grow-out behavior.
On straight hair, the top layer hits an awkward phase where it flips outward and loses its rounded shape. On curly hair, that specific problem doesn’t happen — curls hold shape as they lengthen rather than flipping at an in-between length. The top layer just gets gradually longer and slightly less rounded, which on curls reads as a natural evolution rather than an obvious “this needs a trim” signal.
The trade-off: curly grow-out can look puffier than straight-hair grow-out. As the top layer lengthens and the disconnection closes, the volume in the top section increases without the clean bell shape containing it. The silhouette gets more diffuse, less defined.
The natural progression: curly jellyfish → curly wolf cut → voluminous layered curls. A stylist can reshape the transition at each stage, blending the disconnection gradually so you never hit a phase where the cut looks like it’s failing. Trim frequency on curly hair: every five to seven weeks for the top layer — slightly more forgiving than on straight hair because curl texture hides imprecision that would be visible on smooth hair.
Who Should Skip the Curly Jellyfish Cut
Honest assessment. This isn’t gatekeeping — it’s preventing a haircut you’ll resent by month two.
Very fine, low-density curls. The bottom layer will look sparse. The visual weight concentrates at the top, and there’s nothing anchoring the bottom. The cut reads as top-heavy and unfinished.
Extremely tight coils (4B–4C) with low density. The disconnection between layers may not be visible enough to read as intentional. Both layers can merge into a single shape, losing the two-tiered structure that makes the cut distinctive. High-density coils at these patterns can work — but the styling and maintenance demands are significant.
Anyone who wants the straight-hair version on curly hair. If your goal is a clean, geometric, sharp-edged jellyfish silhouette, curls will not produce that. They’ll produce something rounder, softer, and more textured. If you can’t embrace that difference, the cut will frustrate you.
Anyone without access to a texture-specialist stylist. A jellyfish cut done wrong on straight hair is a bad layered cut. A jellyfish cut done wrong on curly hair — wet-cut, with no shrinkage planning, no density assessment, by a stylist who doesn’t work with textured hair regularly — can leave you with months of awkward growing-out ahead. The skill requirement is higher. Don’t compromise on it.
Anyone in extreme humidity who needs the silhouette to hold shape all day. The top layer will expand. The proportions will shift. If you’re in a climate where humidity is a daily reality, expect the cut to look different outdoors than it does in the salon, and decide if that version is one you can work with.
Curly Jellyfish Cuts Across Patterns and Densities
These images are selected to show how different curl patterns genuinely change this cut’s behavior — not to curate a gallery of the best-lit, most flattering angles.
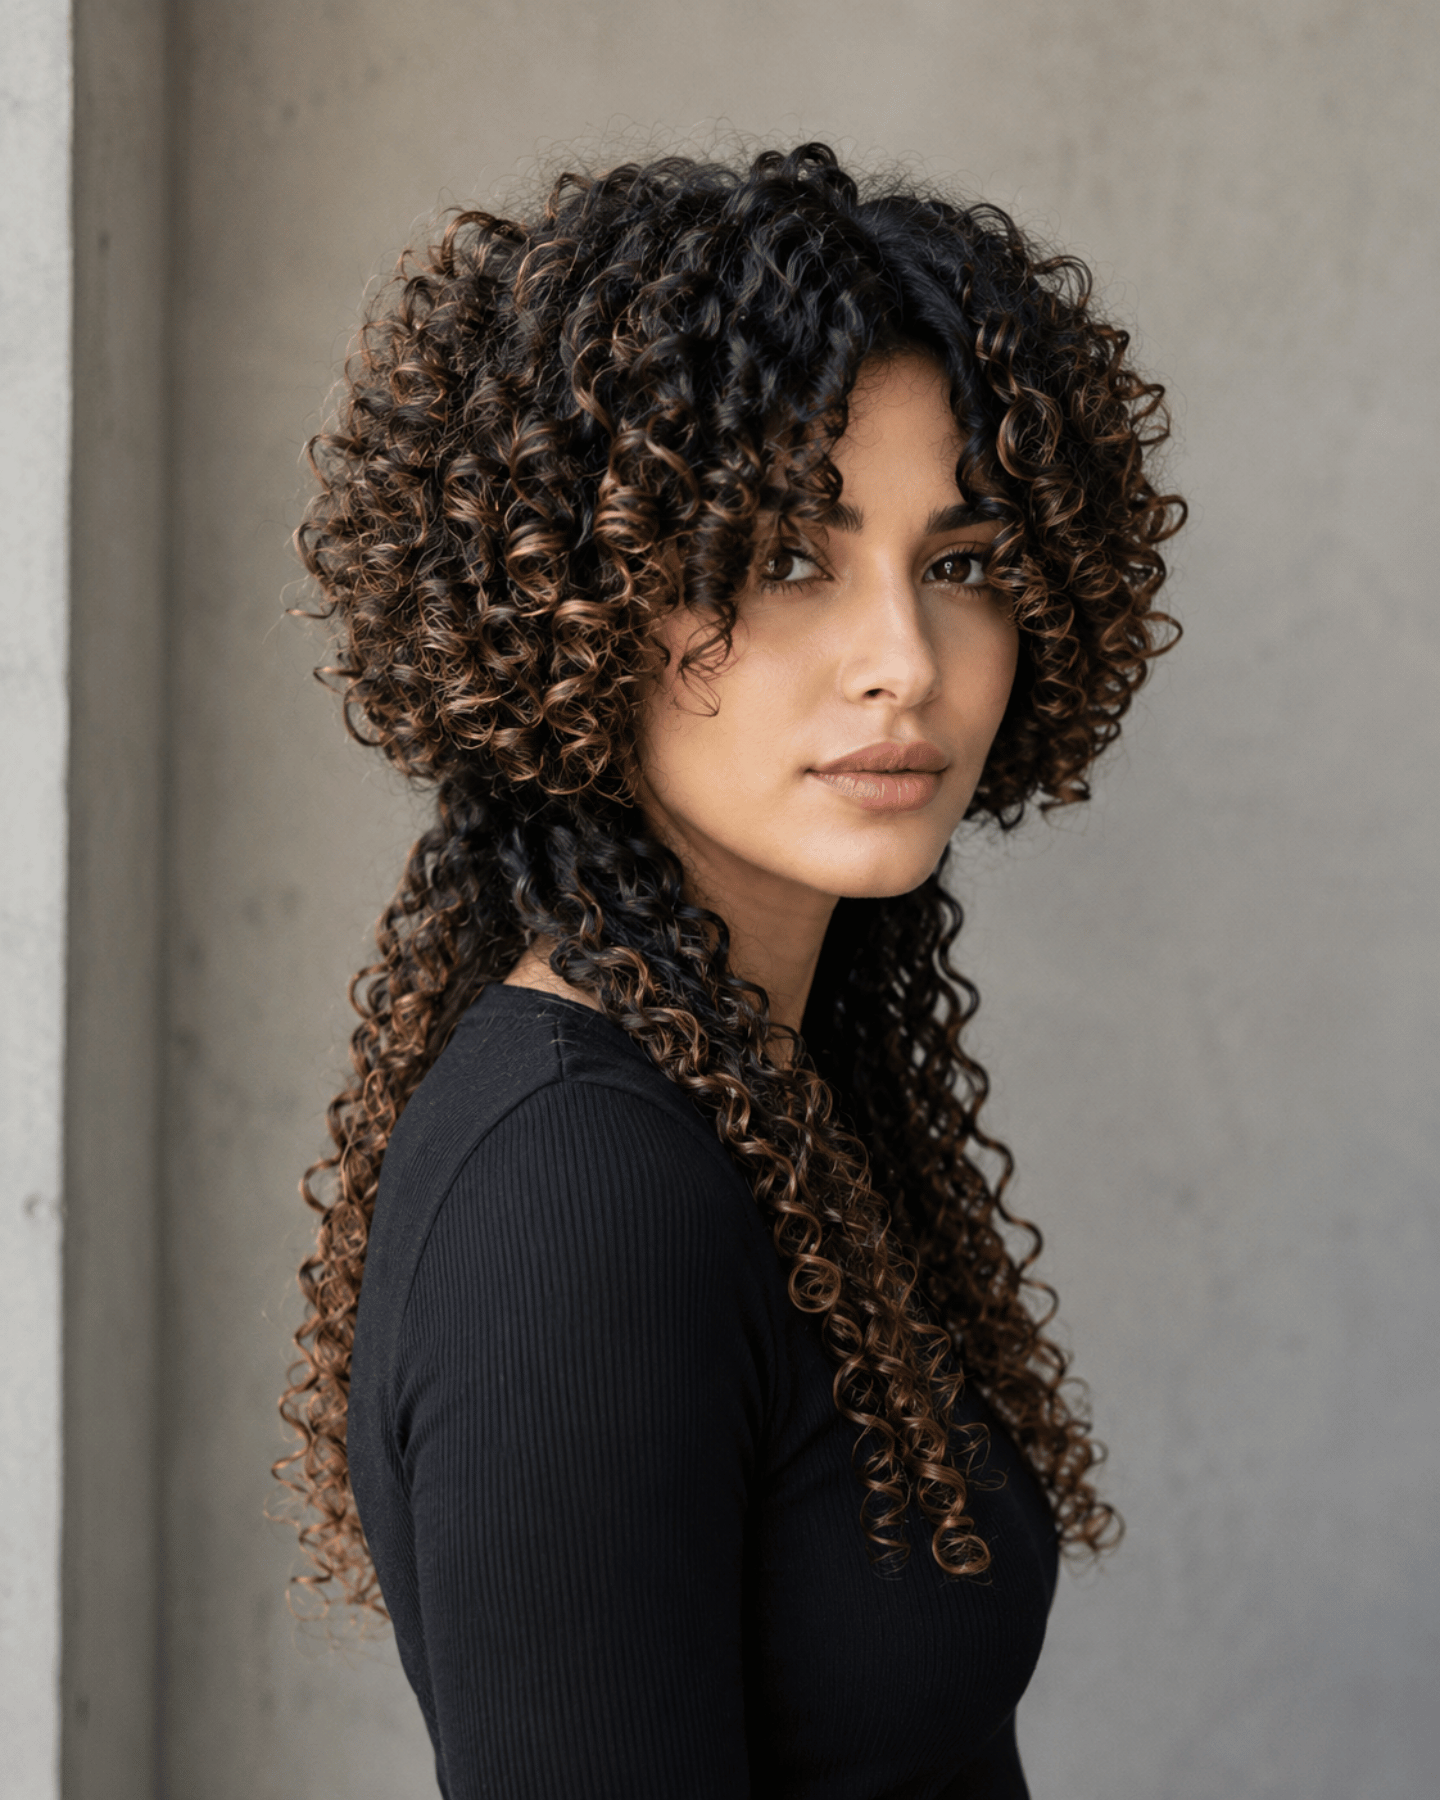
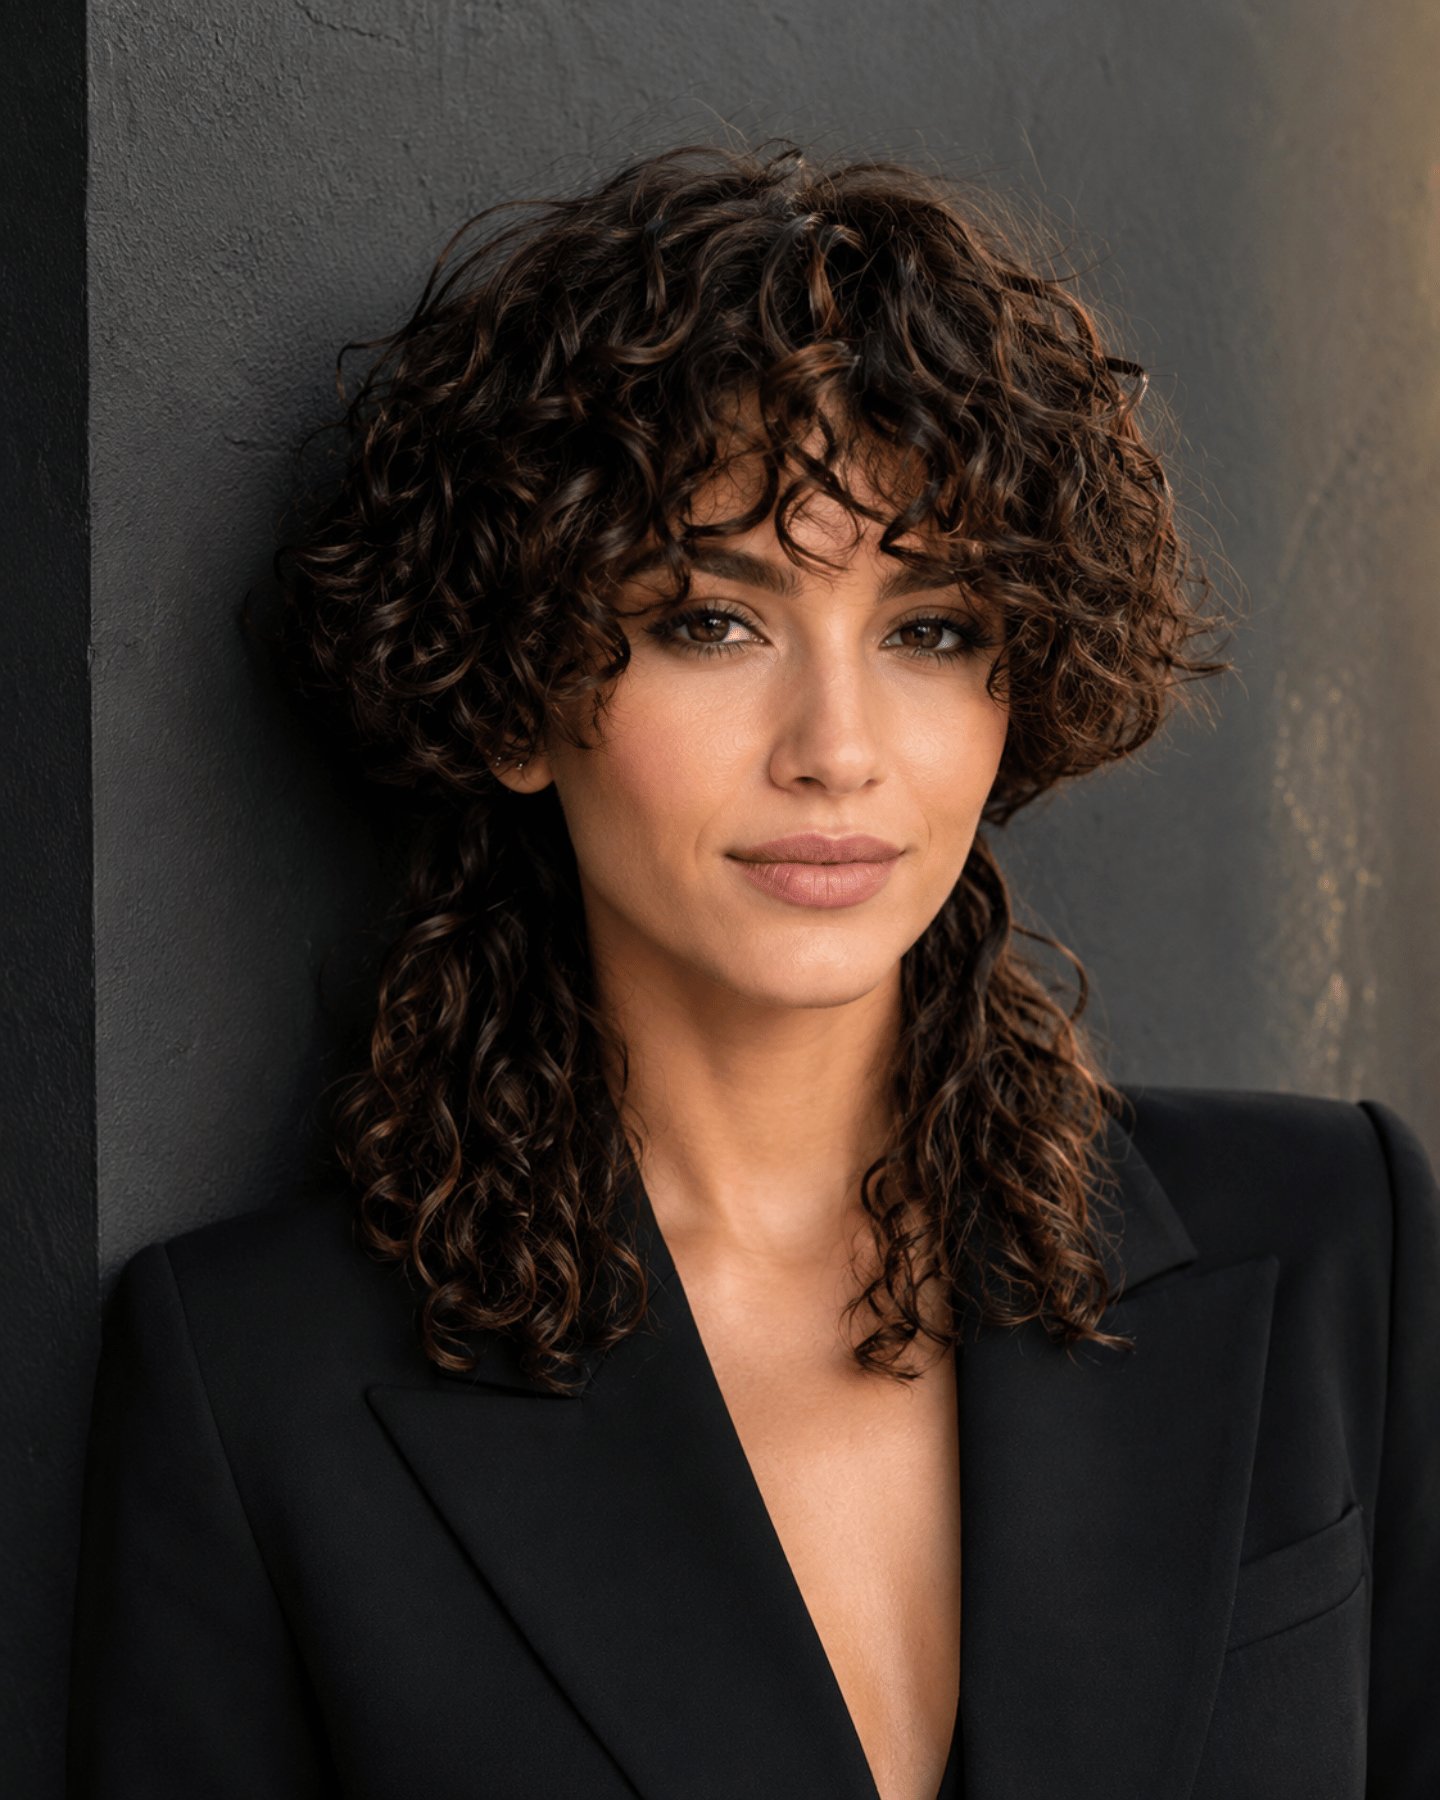
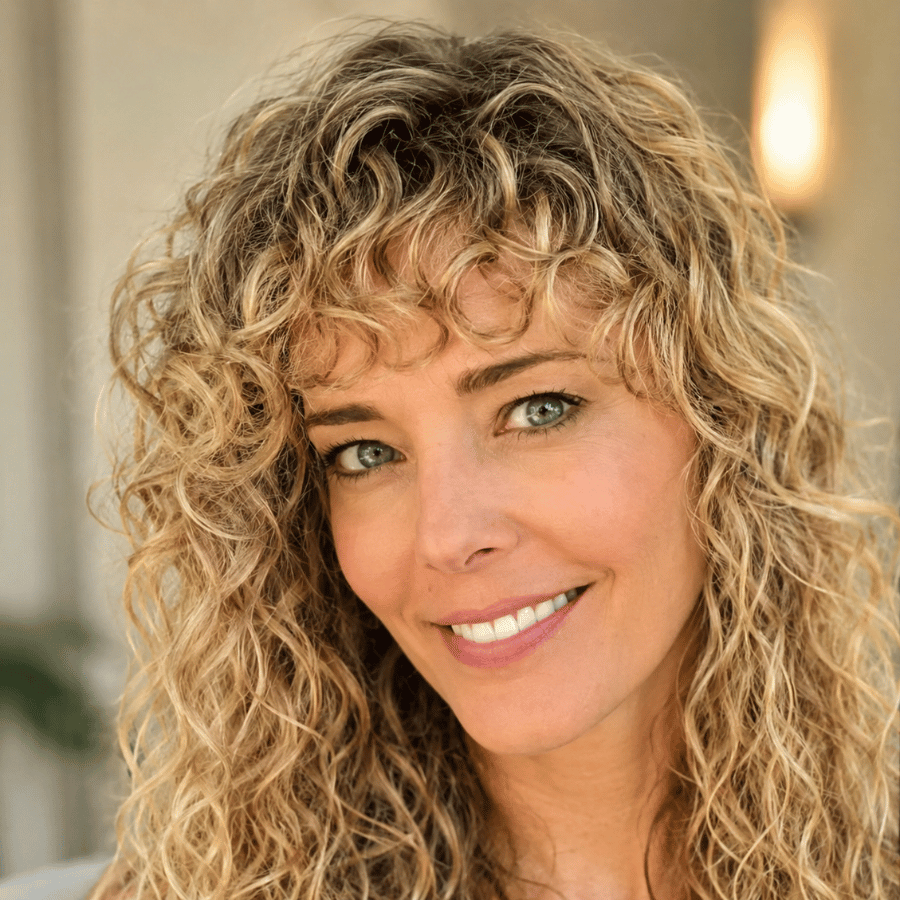
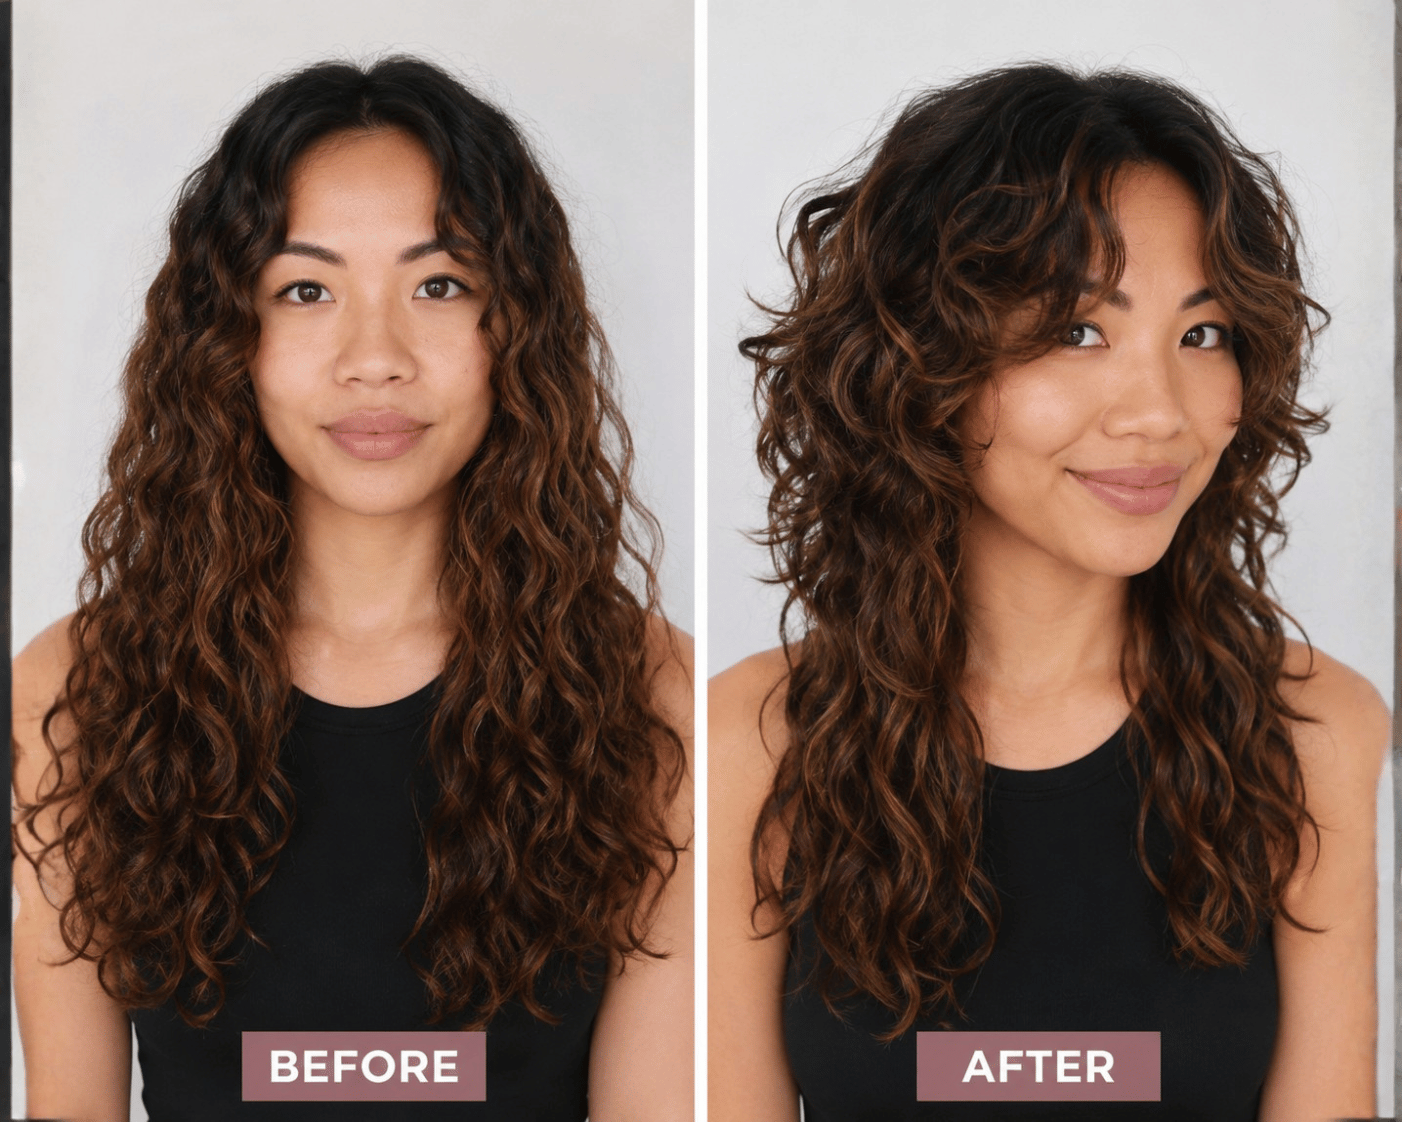
The curly jellyfish cut isn’t a straight-hair cut that happens to be on curls. It’s its own shape — rounder, bolder, more dramatic, and more demanding of the right stylist and the right expectations. When it works, it’s one of the most striking versions of this cut that exists. When it doesn’t, it’s usually because someone treated curly hair as a variable to work around rather than a texture to design for.
If you’re considering this cut and want to know how your specific curl pattern, density, and lifestyle would interact with it, a consultation takes the guesswork out. A stylist who works with textured hair regularly can assess what your curls actually do — not what they look like in a photo — and tell you which version of this cut survives your real routine.
FAQ
Should a jellyfish cut on curly hair be cut wet or dry? Dry. Always. Cutting curly hair wet or stretched for a jellyfish cut almost guarantees that the proportions will be wrong once the curls contract. Dry cutting lets the stylist place the disconnection exactly where it needs to sit on your natural curl pattern — no shrinkage guessing, no correction appointments.
How much shorter will the top layer look once my curls dry? Depends on your curl pattern. 2C waves may lose half an inch. 3A curls typically lose one to two inches. 3B curls can lose two to three inches. 3C and tighter patterns may see three to four inches or more of apparent lift. This is why dry cutting matters — and why straight-hair reference photos set wrong expectations for curly hair.
Can I air-dry a curly jellyfish cut or do I need to diffuse? Both work, but they produce different results. Air-drying gives a softer, more relaxed version where the disconnection is present but muted. Diffusing with a concentrator on the top layer produces a more defined, controlled bell shape that reads closer to the classic jellyfish silhouette. Neither is wrong — but know which outcome you’re after before deciding your routine.
How often do curly jellyfish cuts need trims? Every five to seven weeks for the top layer. Curly texture is slightly more forgiving than straight hair because the curls hide small imprecisions in length that would be visible on smooth hair. But the disconnection still needs maintenance — once the top layer grows long enough to blur into the bottom, the jellyfish effect fades and you’re wearing a generic layered cut that doesn’t commit to anything.